Most recommended: 7 ways to take screenshots on computers and laptops
You can use keyboard shortcuts or tools available on Windows, macOS, Linux to take a screenshot of your computer. Taking screenshots is one of the fastest ways to record content on the screen, such as web page content, error messages. You can use these tools below for many different purposes: capturing the entire screen, capturing a program window, capturing any part of the screen.
Take screenshots with keyboard shortcuts
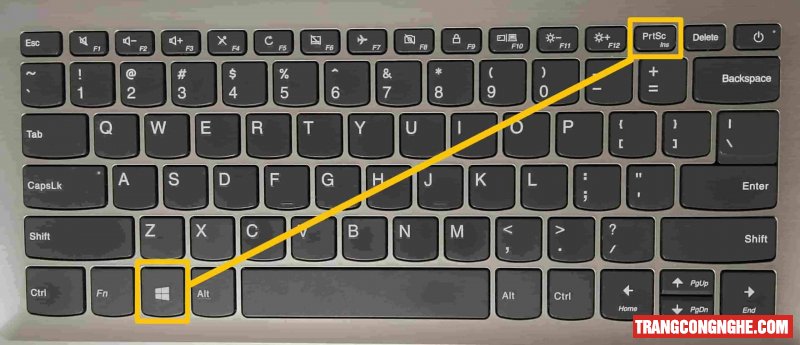
On Windows 10, 8/8.1, you can capture the autosave PC screen with just the following shortcut:
- Press Windows + PrtSc or Windows + Fn + PrtSc to capture the whole computer screen. To view the photos you just took, go to the Pictures > Screenshots folder:
- Press Windows + Alt + PrtSc to capture the open window. Go to C:\Users\Admin\Videos\Captures to get the captured image.
It may have been slightly modified if you can't find the PstSc key (depending on the brand).
Take screenshots and save them to the clipboard
Sometimes you want to take a screenshot but don't want to save it to your computer's memory. You want to send it right away or put it in photo editing software to make extra notes before sending, then try taking a screenshot but saving it to the clipboard below:
- Press PrtSc to capture the whole screen.
- Click on the window to capture, press Alt + PrtSc to capture a window on the screen.
- Press Windows + Shift + S, and then drag to capture part of the screen.
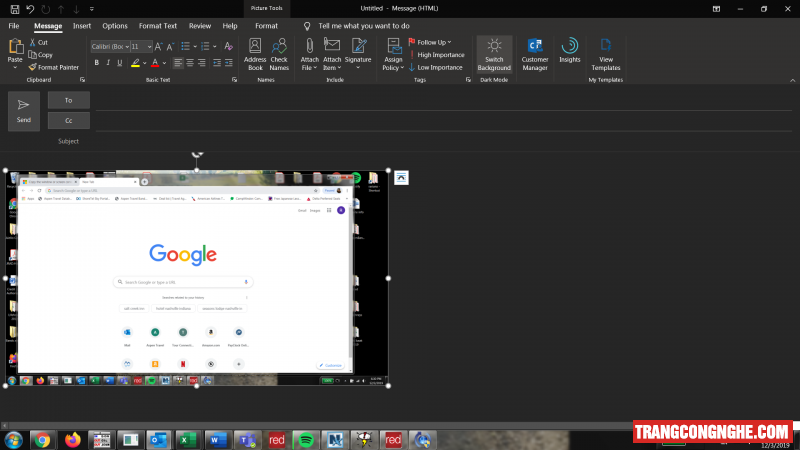
Photos after taking are saved to the clipboard. You need to press Ctrl + V to paste them into chat frames, comments, Word, or photo editing applications, such as Paint (I will guide detailed instructions below) to add notes or highlight photos.
Take screenshots with Snipping Tool
Snipping Tool is also a built-in tool on all versions of Windows, and taking screenshots with the Snipping Tool must be extremely handy.
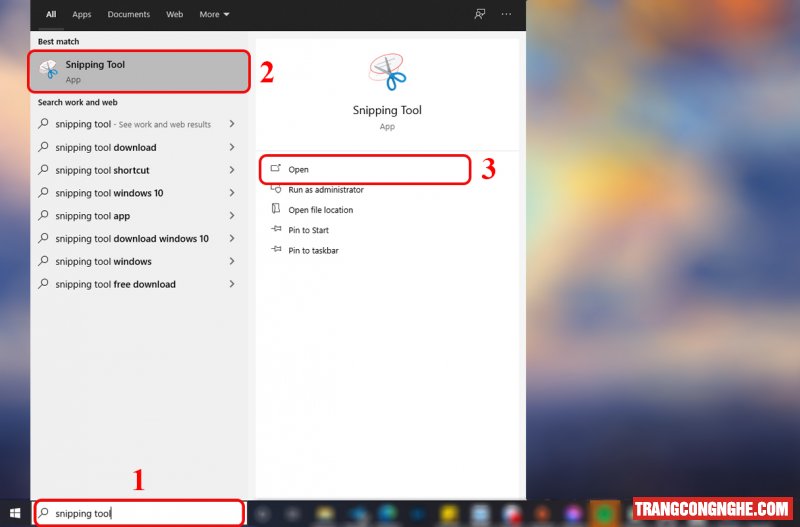
Step 1: Enter Snipping Tool in the search box, click on the software appearing.
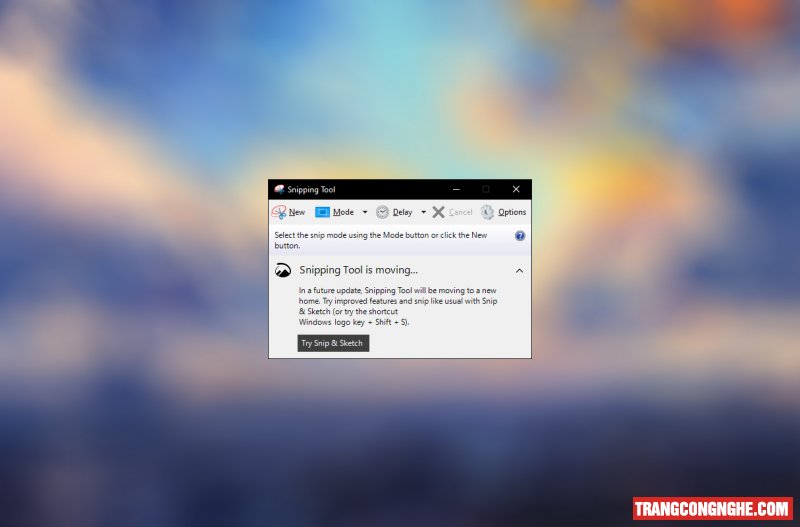
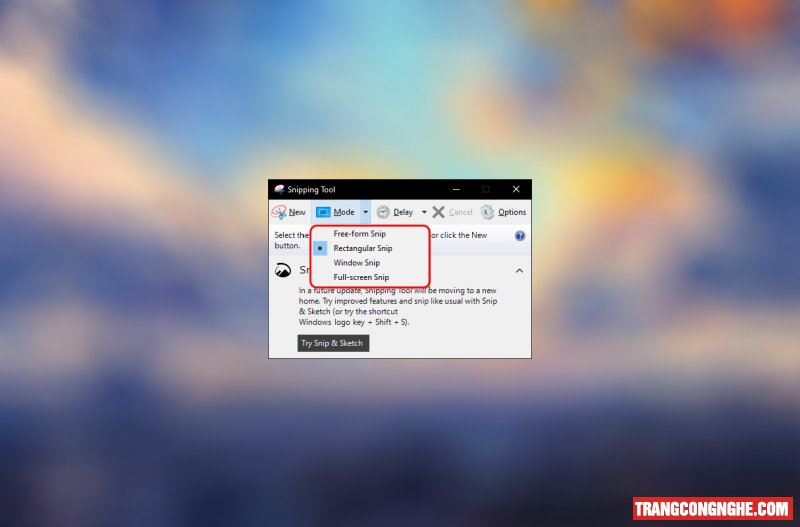
Step 2: Choose a shooting style. Snipping Tool has four shooting modes:
- Free-form Snip: Take a picture freely. The border of the image is the line you circle on the screen
- Rectangular Snip: Capture a photo into a rectangular frame
- Window Snip: Capture an open window
- Full-screen Snip: Capture the entire screen
- On Win 7, you click the arrow to the right of the word New and select the mode.
- On Windows 10, click the arrow to the right of the word Mode to select the mode.
Step 3: Click New to take a screenshot.
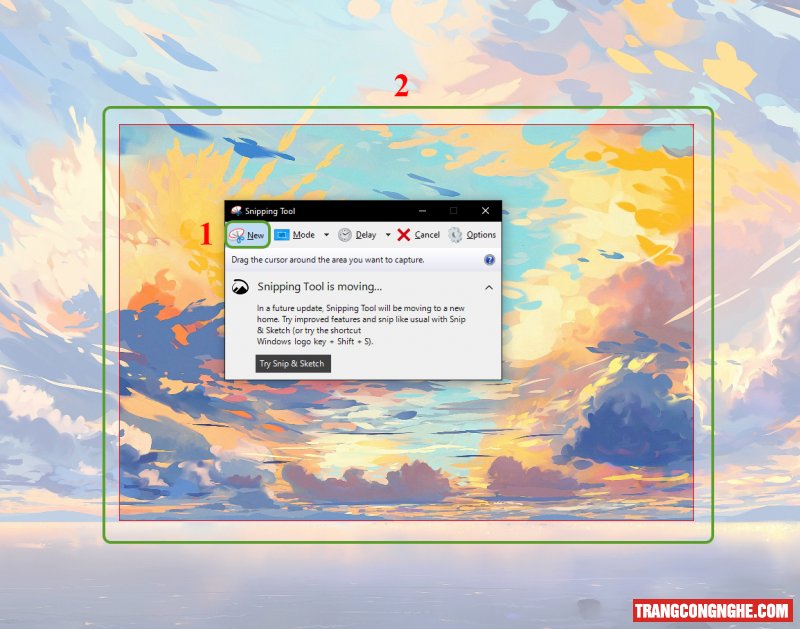
Step 4: Click on the screen, hold and drag to start zoning the screen you want to capture and release the mouse when circling is complete.
Step 5: Screenshot is created and opened in the Snipping Tool window
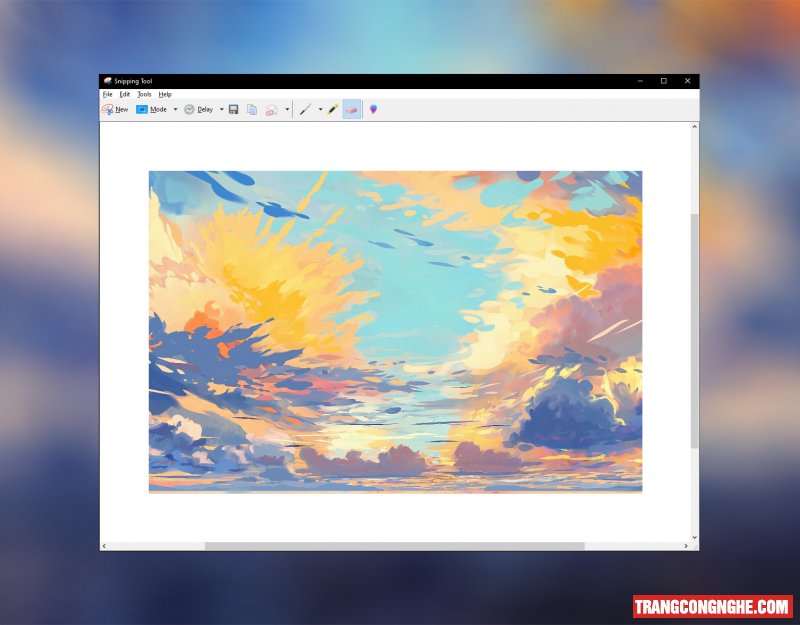
Step 6: Click the pen icon as shown to mark on the photo.
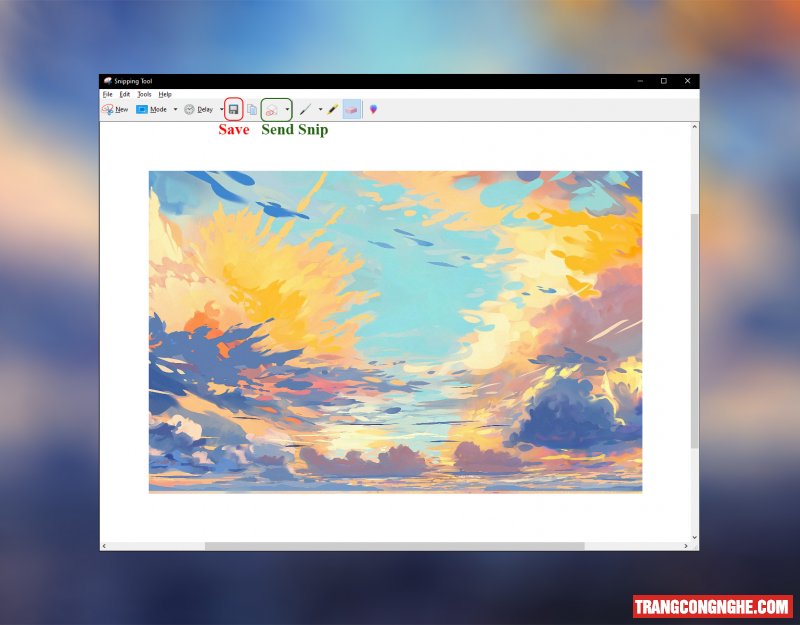
Snipping Tool will save the image to the clipboard. You can Ctrl + V to paste the image into Photoshop or Paint to edit it further (I will guide you below), paste it into a chat application like Viber, Facebook Messenger, Zalo to send to friends. Or Ctrl + S to save photos to the folder you want on your computer.
If you often have to take screenshots, you should pin the Snipping Tool on the Taskbar. With just 2 clicks, you can capture the screen area you want and save it and send it to your friends. To pin the Snipping Tool, open the Snipping Tool, right-click the Snipping Tool's icon on the Taskbar, and select Pin to Taskbar.
Take screenshots and make notes with Snip & Sketch
Besides Paint, Snipping Tool, Windows 10 also has another excellent screen capture tool called Snip & Sketch. You can open Snip & Sketch using two different methods.
Open Snip & Sketch with the PrtScn button
Windows 10 allows users to quickly activate the Snip & Sketch screen capture tool with the PrtScn button. Here's how to do it:
- Press Windows + I to open Settings
- Find and click Ease of Access
- Scroll down to find and click Keyboard in the left sidebar
- Scroll down to find and then turn the switch Print Screen shortcut to On
The installation is done. From now on, the Snip & Sketch screen capture tool will be activated when you press the PrtScn button.
Open Snip & Sketch with the Start menu
Here's how to open the basic Snip & Sketch tool. You follow these steps:
- Press Windows to open the Start menu
- Import Snip & Sketch
- Click on the first result in the search results box to open the Snip & Sketch tool
Snip & Sketch is a pretty versatile tool. It allows you to take a screenshot as full screen, snap a rectangular tile, capture a custom tile with a free shape, capture an application window. After taking a photo, Snip & Sketch provides users with editing options such as cropping, zooming.
You can also highlight the subject in the photo, make notes with handwriting, ballpoint pen, pencil, or eraser.
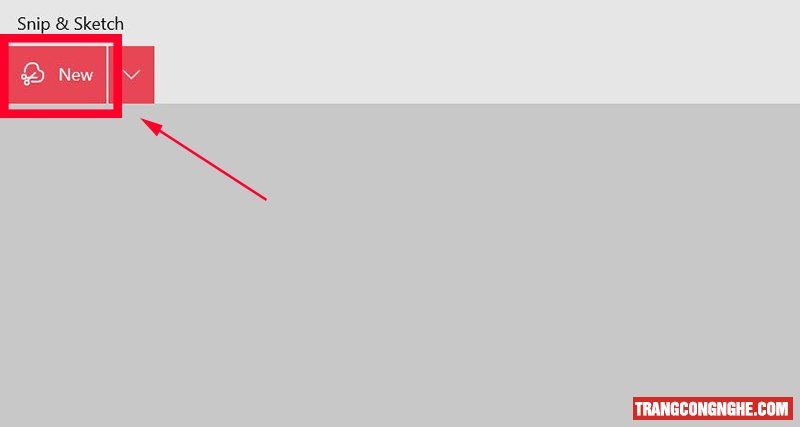
Creat a new screenshot:
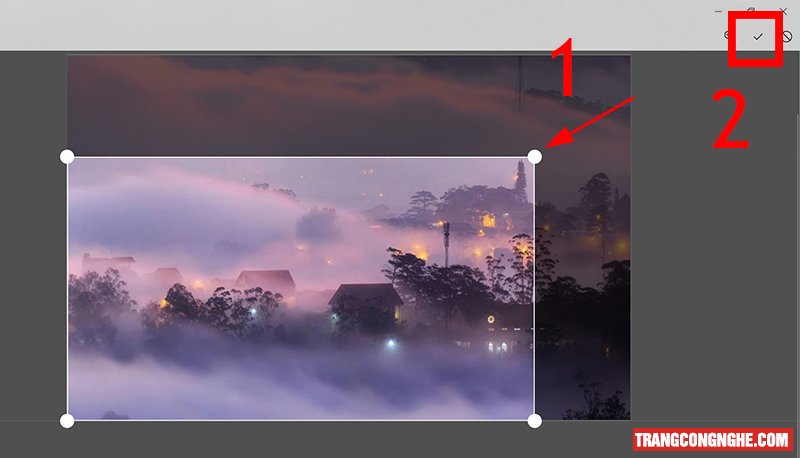
Choose the area:

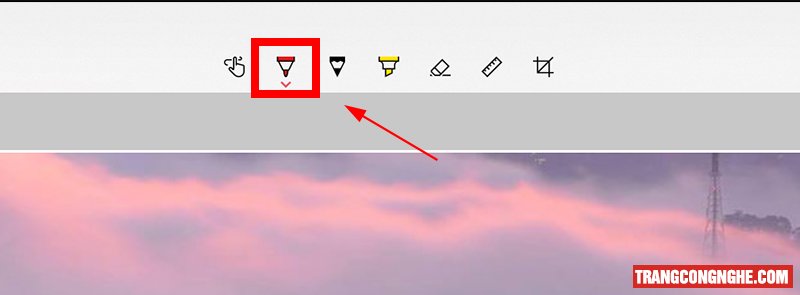
Pen tool:
Crop tool:
Make Notes on Screenshots with Paint
Of the four ways to take a screenshot above, there is only one way to capture the screen while editing, cropping, or writing texts on the photo. Therefore, you need to add another photo editing tool to do this. Below, I will show you how to take a screenshot and then edit it with Paint (an application available on the computer). This method applies to all versions of Windows from Windows XP, Windows 7, Windows 8 /8.1 to Windows 10.
You take a screenshot in one of the ways above. Then open Paint by typing Paint in the search bar.
The Paint interface window appears. Press Ctrl + V to paste the image you just took.
If you only want to take a part of the screen you just captured, click Select, create a selection on the captured image by clicking and dragging the mouse, then click on the Crop tool.
To insert text into the image, click on the letter A, place the mouse on the position where you want to write the text, select the font style, font size, font color, write the text, and remove the mouse from the frame.
Finally, you press CTRL+S to save the image.
How to take screenshots on a Mac
Below are steps to taking screenshots on a high-end Mac screen:
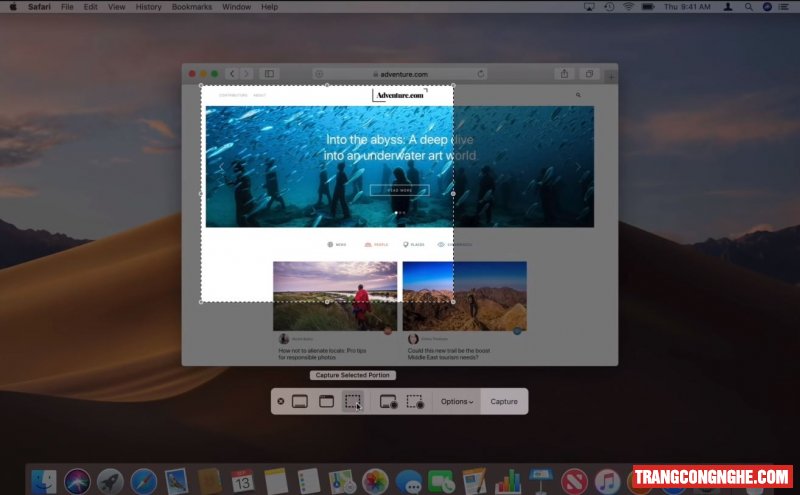
- To capture the full screen of your Mac, press Shift + Command + 3.
- To capture part of the Mac screen, press Shift + Command + 4.
- To capture a menu on a Mac, press Shift + Command + 4 + spacebar.
You can find the screenshot on the desktop with a name in the format Screen Shot [date] at [time].png
How to take screenshots on a Linux computer
To take a screenshot of Linux, use the Spectacle, Shutter, command line, or GNOME screenshot tool on Ubuntu.

Above are some ways to take screenshots in the blink of an eye. Good luck!